Makeup sponges are essential tools for many beauty routines. They help blend foundation, concealer, and other products for a flawless look.
However, they can also collect dirt and bacteria if not cleaned properly. Cleaning makeup sponges is crucial for both your skin’s health and the sponge’s lifespan. Dirty sponges can lead to breakouts and skin irritation. Learning how to clean them effectively can make a big difference.
It’s not just about hygiene; it also improves your makeup application. A clean sponge absorbs less product and blends better. This guide will show you simple steps and tips to keep your makeup sponges fresh and ready for use. Get ready to enhance your beauty routine with clean tools!
The Importance Of Clean Makeup Sponges
Keeping makeup sponges clean is essential for good skin health. Dirty sponges can harbor bacteria. They can also affect how your makeup looks. Regular cleaning helps maintain your beauty tools. It keeps your skin fresh and glowing.
Preventing Bacterial Growth
Makeup sponges are a breeding ground for bacteria. They absorb moisture and makeup. This creates a perfect environment for germs. Here are some key points:
- Wash sponges regularly to prevent bacteria.
- Use soap or a gentle cleanser to clean them.
- Rinse thoroughly to remove all soap residue.
Using dirty sponges can lead to skin problems. You may face breakouts or irritation. Clean sponges help you avoid these issues.
Maintaining Makeup Application Quality
Clean sponges ensure a smooth makeup application. They help blend products evenly on your skin. Here’s why clean sponges matter:
- They prevent patchy makeup.
- They enhance the finish of your foundation.
- They help your makeup last longer.
Invest time in cleaning your sponges. It pays off with flawless makeup. You deserve a polished look every day.
Types Of Makeup Sponges
Makeup sponges are essential tools for many beauty routines. They help apply and blend makeup evenly. Understanding the types of makeup sponges can improve your makeup game. Different sponges serve different purposes. Choosing the right one is key.
Material Variations
Makeup sponges come in various materials. Each material affects how the sponge performs.
Latex sponges are popular. They are affordable and easily available. However, they can irritate sensitive skin.
Foam sponges are soft and lightweight. They absorb less product, making them great for liquid foundations. They provide a smooth finish.
Silicone sponges are newer to the market. They do not absorb makeup. This means less waste. They are easy to clean and can last longer.
Shapes And Their Purposes
The shape of a sponge matters. Different shapes help with different tasks.
The classic egg shape is versatile. It works well for most applications. Use the pointed end for hard-to-reach areas.
A flat edge sponge is great for contouring. It helps create sharp lines with cream products.
Some sponges have unique shapes. They are designed for specific uses. For instance, a mini sponge is perfect for under-eye concealer.
Daily Cleaning Routine
Cleaning makeup sponges daily keeps them fresh. It helps prevent bacteria growth. A quick cleaning routine is easy to follow. Here are some simple ways to keep your sponges clean.
Quick Cleansing Methods
Use these quick methods to clean your makeup sponges each day:
- Soap and Water: Wet the sponge. Apply a small amount of gentle soap. Rub gently under running water.
- Microwave Method: Mix water and soap in a bowl. Submerge the sponge. Microwave for 1 minute. Let it cool before removing.
- Alcohol Spray: Fill a spray bottle with rubbing alcohol. Lightly spray the sponge. Wipe with a clean towel.
These methods are fast and effective. Choose one that fits your routine.
Drying Techniques For Daily Use
Drying your sponges correctly is important. Moist sponges can harbor germs. Here are some effective drying techniques:
- Air Dry: Place the sponge on a clean, dry towel. Let it air dry completely.
- Stand Up: Use a sponge holder. This allows air to circulate. It speeds up the drying process.
- Avoid Heat: Never use a hairdryer. Heat can damage the sponge material.
Proper drying helps maintain the sponge’s shape. It also extends its life.

Credit: www.youtube.com
Deep Cleaning Process
Makeup sponges need deep cleaning to stay fresh and safe. Dirt and bacteria build up over time. This can cause skin issues. Regular cleaning helps maintain their quality. Here’s how to do it right.
Natural Vs. Chemical Cleaners
Choosing the right cleaner is important. Natural cleaners are gentle. They often include soap and water. Vinegar or olive oil can also work well. These options are safe and effective.
Chemical cleaners are stronger. They can remove tough stains. However, they may irritate sensitive skin. Always check the ingredients. Choose what suits your needs best.
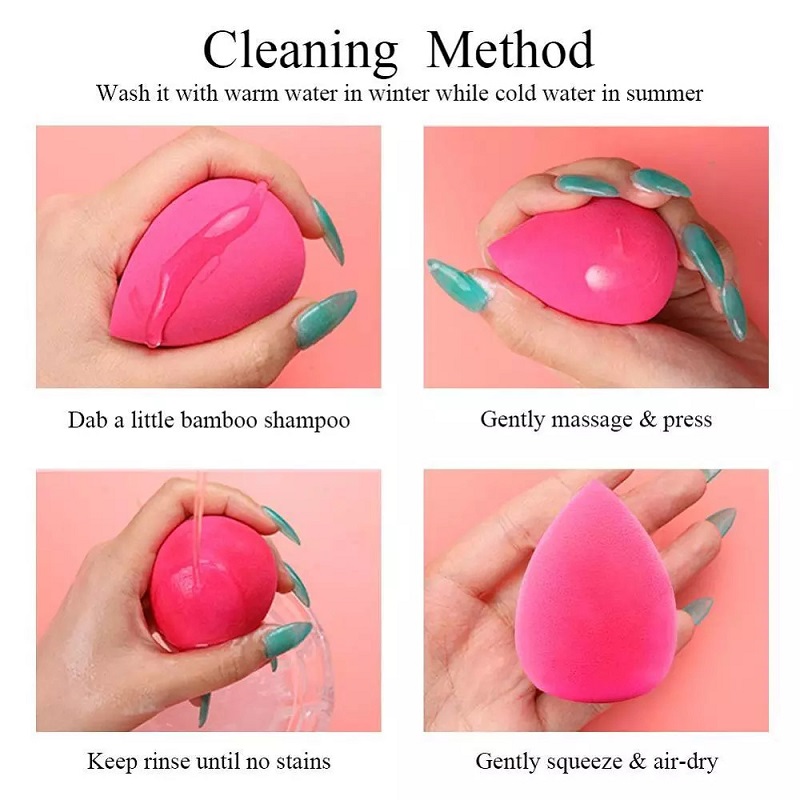
Step-by-step Guide To Thorough Cleaning
Start by rinsing your sponge with warm water. This helps remove excess makeup. Next, apply your chosen cleaner. Use a gentle soap or a few drops of oil.
Gently massage the sponge. Focus on stained areas. Rinse thoroughly until the water runs clear. Squeeze out excess water gently. Avoid twisting or pulling too hard.
For deeper cleaning, soak the sponge in warm soapy water. Let it sit for a few minutes. Rinse again and check for any remaining stains. Repeat if necessary.
Once clean, let the sponge air dry. Place it in a clean, dry area. Avoid direct sunlight. This keeps it safe and ready for your next use.
Stain Removal Tricks
Cleaning makeup sponges can be tricky. Stains from foundation, concealer, and other products can be tough to remove. Here are some effective tricks to tackle those stubborn stains and keep your sponges fresh.
Dealing With Tough Stains
Some stains cling to makeup sponges. Follow these steps to remove them:
- Use warm water: Soak the sponge in warm water.
- Apply soap: Use gentle soap or a specialized sponge cleaner.
- Gently squeeze: Press the sponge to release the makeup.
- Rinse thoroughly: Ensure all soap and stains are gone.
- Repeat if necessary: Some stains need multiple tries.
Home Remedies For Stain Lifting
Many household items can help lift stains. Try these methods:
- Olive oil: Mix one part olive oil with two parts dish soap. This breaks down makeup.
- Vinegar and baking soda: Create a paste. Apply it to the stained areas. Let it sit for 10 minutes.
- Baby shampoo: This gentle option works well. Use it like regular soap.
- Micellar water: Use it as a pre-soak. It helps lift makeup before washing.
Choosing the right method depends on the stain type. Experiment to find what works best for you.
Disinfecting Your Makeup Sponges
Cleaning your makeup sponges is not enough. Disinfecting them is key. Makeup sponges can harbor bacteria and germs. This can lead to skin problems. Regular disinfection helps keep your skin healthy.
Importance Of Disinfection
Disinfecting your makeup sponges is crucial for many reasons:
- Prevents Skin Issues: Bacteria can cause acne and irritation.
- Extends Sponge Life: Proper care makes sponges last longer.
- Ensures Makeup Quality: Clean sponges apply makeup evenly.
Regular disinfection helps maintain the effectiveness of your products. It also keeps your beauty routine safe and hygienic.
Safe Disinfecting Agents For Sponges
Choose safe agents to disinfect your makeup sponges. Here are some effective options:
| Disinfecting Agent | How to Use |
|---|---|
| Soap and Water | Mix gentle soap with warm water. Soak and rinse. |
| Isopropyl Alcohol | Spray directly on sponge. Let it sit for 10 minutes. |
| Vinegar Solution | Mix equal parts vinegar and water. Soak for 15 minutes. |
Always rinse sponges thoroughly after using any disinfectant. This helps remove all residues. Your skin will thank you for clean, safe tools.
When To Replace Your Makeup Sponge
Makeup sponges are essential tools for beauty routines. They help blend foundation and concealer smoothly. Knowing when to replace them is crucial for skin health and makeup quality. Using worn sponges can lead to uneven makeup and skin irritation.
Here are some clear signs that show it’s time for a new sponge.
Signs Of Wear And Tear
Look for visible damage on your sponge. Cracks, tears, or holes indicate it’s time to replace it. A discolored sponge also suggests it has absorbed too much product.
Check for an unusual smell. If your sponge smells bad, it’s a sign of bacteria buildup. This can cause breakouts and skin issues.
Another sign is a change in texture. A sponge should feel soft and bouncy. If it feels hard or rough, it’s time to buy a new one.
Lifespan Of Different Sponge Types
The lifespan of a makeup sponge depends on its type. Latex sponges last about 1 to 3 months. They often wear out quickly with regular use.
Beauty blenders can last up to 6 months with proper care. Keep them clean to extend their life.
Silicone sponges tend to last longer. They can last over a year. Their non-porous nature prevents bacteria buildup.

Credit: beautyblender.com
Environmentally Friendly Disposal
Makeup sponges are often thrown away without a second thought. This can harm the environment. Many sponges are made from materials that do not break down easily. Learning how to dispose of them properly is important. It helps reduce waste and protects our planet.
Recycling Old Makeup Sponges
Recycling makeup sponges can be tricky. Many sponges are not recyclable in regular bins. However, some options exist:
- Check local recycling rules: Some areas accept certain types of foam.
- Contact companies: Some brands offer take-back programs.
- Use specialized recycling services: Look for companies that recycle beauty products.
Before recycling, clean the sponges. Remove makeup residue. This ensures a better recycling process.
Eco-friendly Disposal Options
If recycling is not an option, consider these eco-friendly disposal methods:
- Composting: If made from natural materials, sponges can go in compost.
- DIY Projects: Use old sponges for crafts or cleaning.
- Donate: If in good condition, some charities accept them.
Remember, every small action counts. Dispose of makeup sponges responsibly. Protect the environment. Make a difference.
Expert Tips And Tricks
Cleaning makeup sponges can seem hard. But with the right tips, it becomes simple. Experts share their best advice for keeping sponges clean and safe. Follow these tips to maintain your sponges and your skin.
Advice From Makeup Artists
Makeup artists know the importance of clean tools. Here are their top tips:
- Wash After Each Use: Clean your sponge right after using it.
- Use Gentle Soap: Choose a mild soap or sponge cleaner.
- Warm Water: Rinse with warm water to help remove makeup.
- Press, Don’t Rub: Press the sponge to clean; rubbing can damage it.
- Deep Clean Weekly: Do a thorough clean once a week.
Common Mistakes To Avoid
Even experienced users make mistakes. Avoid these common errors:
| Mistake | Why to Avoid |
|---|---|
| Skipping Regular Cleaning | This can lead to bacteria buildup. |
| Using Harsh Chemicals | They can damage the sponge material. |
| Storing Wet Sponges | Moisture encourages mold growth. |
| Not Rinsing Thoroughly | Soap residue can irritate your skin. |
Stay aware of these tips. Keeping your makeup sponges clean is essential. It helps your skin stay healthy and your makeup look great.
Credit: nowbenidorm.com
Faqs On Cleaning Makeup Sponges
Cleaning makeup sponges can raise many questions. Understanding the best methods helps keep your sponges in top shape. Here, we address common concerns and provide quick answers to frequent questions.
Addressing Common Concerns
Many people worry about how often to clean their sponges. Sponges should be cleaned after every use. This prevents bacteria and buildup of makeup.
Another concern is what to use for cleaning. Mild soap or a gentle cleanser works best. Avoid harsh chemicals that can damage the sponge.
Some users wonder if they can use a washing machine. While it may seem easy, this can ruin the sponge. Hand washing is always the safest choice.
Quick Answers To Frequent Questions
How long should I soak my sponge? Soaking for five to ten minutes is enough.
Can I use dish soap? Yes, but choose a gentle formula. Harsh dish soaps may harm the sponge.
What about using vinegar? Vinegar is a good natural cleaner. Mix it with water for a gentle wash.
Is it safe to microwave my sponge? Microwaving can kill bacteria, but it can also damage the sponge. Avoid this method.
What signs show I need a new sponge? If the sponge has tears or smells bad, it’s time for a replacement.
Frequently Asked Questions
How Often Should I Clean My Makeup Sponges?
You should clean your makeup sponges at least once a week. Regular cleaning prevents bacteria buildup and keeps your sponges in good condition. If you use them daily, consider washing them after each use for optimal hygiene. This practice also ensures better application of your makeup products.
What Is The Best Way To Clean Makeup Sponges?
The best way to clean makeup sponges is using warm water and a gentle cleanser. You can use a specialized sponge cleaner or mild soap. Gently squeeze and rinse until the water runs clear. Avoid harsh chemicals, as they can damage the sponge material and reduce its lifespan.
Can I Use Dish Soap To Clean Sponges?
Yes, you can use dish soap to clean makeup sponges. Opt for a gentle, unscented dish soap to avoid skin irritation. Mix it with warm water and soak the sponge for a few minutes. Rinse thoroughly to remove any soap residue and ensure a clean sponge for future use.
Is It Safe To Microwave Makeup Sponges For Cleaning?
Microwaving makeup sponges can be safe if done correctly. Use a microwave-safe bowl filled with water and soak the sponge for a minute. This method kills bacteria, but be cautious of overheating. Always allow the sponge to cool before using it again to avoid burns or damage.
Conclusion
Cleaning your makeup sponges is simple and important. Regular cleaning helps keep your skin healthy. It removes dirt and bacteria that can cause breakouts. Use gentle soap and warm water for best results. Rinse thoroughly to avoid any residue. Allow the sponges to dry completely before using them again.
A clean sponge improves your makeup application too. Make this a part of your beauty routine. Your skin will thank you for it. Enjoy a fresh, flawless look every day.