Cleaning your makeup sponge is essential for healthy skin. Dirty sponges can harbor bacteria and cause breakouts.
Makeup sponges are a popular tool for applying foundation, concealer, and other products. They help create a smooth, flawless finish. However, using a dirty sponge can lead to skin issues and affect your makeup’s appearance. Regular cleaning keeps your sponge in good condition and ensures it works effectively.
It also extends the life of the sponge, saving you money in the long run. In this guide, you will learn how to clean your makeup sponge properly. We will cover simple methods and tips to keep your sponge fresh and ready for use. Your skin will thank you for it!
Introduction To Makeup Sponge Maintenance
Makeup sponges are essential tools for applying makeup. They help create a smooth finish. Regular cleaning keeps them fresh and effective. Dirty sponges can harbor bacteria. This can lead to skin issues. Knowing how to maintain them is key for healthy skin.
Importance Of Regular Cleaning
Cleaning your makeup sponge is very important. It prevents the buildup of makeup residue. Old makeup can create a breeding ground for germs. These germs can cause breakouts and skin irritation.
Regular cleaning extends the life of your sponge. It helps maintain its texture and shape. A clean sponge performs better. It applies makeup evenly and smoothly.
Benefits For Skin Health
Clean sponges promote better skin health. They reduce the risk of acne and rashes. Using a dirty sponge can worsen existing skin conditions.
Fresh sponges help maintain your skin’s natural balance. They ensure that your makeup goes on flawlessly. Healthy skin means confidence and a radiant look.
Identifying The Right Time To Clean
Cleaning your makeup sponge is important. Knowing when to clean it helps keep your skin healthy. A dirty sponge can lead to breakouts and irritation. Look for signs that indicate it needs a wash.
Signs Of A Dirty Makeup Sponge
There are clear signs your sponge is dirty. First, check for visible stains. Makeup residue can build up over time. This makes the sponge look worn out.
Next, smell the sponge. An unpleasant odor means bacteria may be growing. If your sponge feels sticky or greasy, it’s time to clean it.
Also, consider how often you use it. Daily use increases dirt and bacteria. Remember, a clean sponge helps apply makeup better.
How Often To Clean
Regular cleaning is key for a healthy makeup routine. Aim to wash your sponge after every use. This may seem like a lot, but it keeps your skin safe.
If daily cleaning isn’t possible, wash it at least once a week. This will reduce buildup and bacteria. Pay attention to your skin’s response. Adjust your cleaning schedule if needed.
Always prioritize cleanliness. Your skin will thank you for it.
Preparation For Cleaning
Cleaning your makeup sponge is essential for healthy skin. Before starting, you need to prepare. Gather your materials and set up your cleaning area. Let’s break this down.
Gathering Necessary Materials
- Makeup Sponge – The sponge you want to clean.
- Soap – Use gentle liquid soap or baby shampoo.
- Warm Water – This helps dissolve makeup and dirt.
- Small Bowl – For soaking the sponge.
- Towel – To dry the sponge afterward.
Setting Up The Cleaning Area
Choose a clean, flat surface. A bathroom counter or kitchen table works well. Make sure it’s easy to clean.
- Clear the area of any clutter.
- Place your bowl on the surface.
- Fill the bowl with warm water.
- Add a few drops of soap to the water.
- Keep the towel nearby for drying.
With everything set, you are ready to clean your makeup sponge. Proper preparation makes the process easier and more effective.
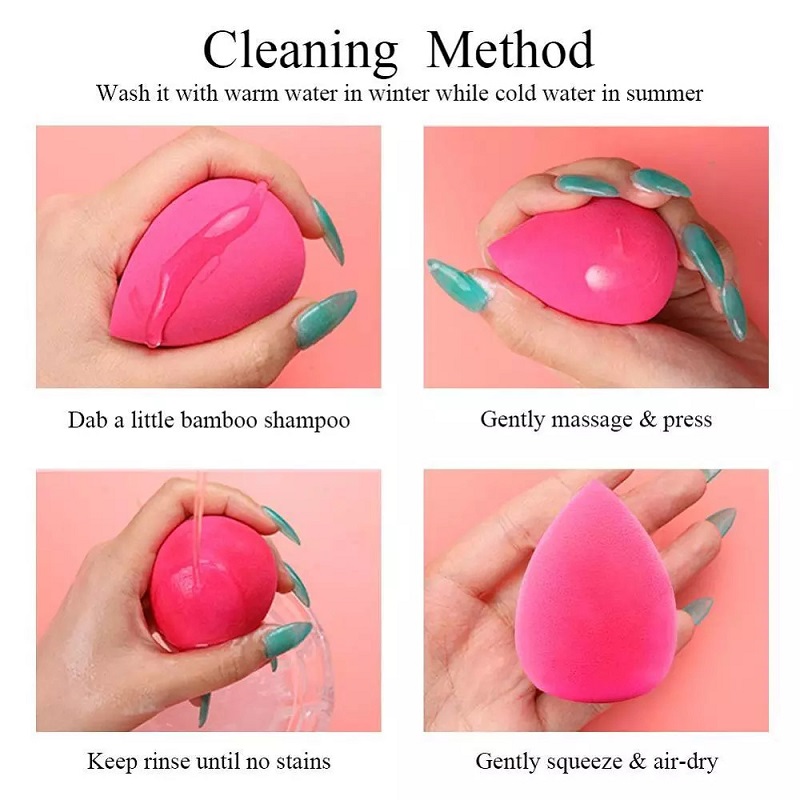
Simple Cleaning Steps
Cleaning your makeup sponge is easy. Follow these simple steps to keep it fresh and free of dirt. A clean sponge helps your makeup look better. It also keeps your skin healthy.
Wet The Sponge
Start by wetting the sponge. Use lukewarm water. Make sure it absorbs the water well. This makes cleaning easier.
Apply Cleanser
Next, choose a gentle cleanser. You can use:
- Liquid soap
- Baby shampoo
- Specialty sponge cleanser
Put a small amount of cleanser on the sponge. Spread it evenly. This helps to remove makeup and dirt.
Gentle Squeezing Technique
Now, use a gentle squeezing technique. Do not scrub hard. Follow these steps:
- Press the sponge gently.
- Rinse under running water.
- Repeat until water runs clear.
This method cleans without damaging the sponge. After cleaning, let it air dry. Place it in a clean, dry area.
Deep Cleaning Methods
Makeup sponges need deep cleaning to stay safe and effective. Regular cleaning helps remove makeup residue and bacteria. Here are some effective deep cleaning methods to keep your sponges fresh.
Soaking The Sponge
Soaking is a simple and effective way to clean your makeup sponge. Follow these steps:
- Fill a bowl with warm water.
- Add a few drops of gentle soap or baby shampoo.
- Submerge the sponge in the soapy water.
- Let it soak for about 10-15 minutes.
- Gently squeeze the sponge to release dirt.
- Rinse under running water until it runs clear.
- Allow the sponge to air dry.
Regular soaking keeps your sponge clean and free from buildup.
Microwave Steam Cleaning
Microwave cleaning is fast and effective. Here’s how to do it:
- Wet the sponge thoroughly.
- Place it in a microwave-safe bowl.
- Add a cup of water to the bowl.
- Microwave on high for 1-2 minutes.
- Let it cool before removing.
The steam kills bacteria and loosens dirt. Always check the sponge before using it again.
Diy Natural Cleaners
Natural cleaners are gentle and effective. Try these simple recipes:
| Ingredients | Instructions |
|---|---|
| Vinegar and Water | Mix equal parts vinegar and water. Soak sponge for 10 minutes. |
| Olive Oil and Dish Soap | Mix 1 part olive oil with 2 parts dish soap. Clean sponge with the mixture. |
| Baking Soda Paste | Combine baking soda and water to make a paste. Scrub sponge with it. |
These natural cleaners help maintain your sponge without harsh chemicals.

Credit: beautyblender.com
Rinsing And Drying The Sponge
Cleaning your makeup sponge is essential for healthy skin. Proper rinsing and drying are key steps. They help remove makeup and bacteria. Let’s explore how to do this effectively.
Proper Rinsing Technique
Start by running warm water over the sponge. Use your fingers to gently squeeze it. This helps loosen any makeup trapped inside. Rinse until the water runs clear.
For tougher stains, apply a small amount of gentle soap. Massage the soap into the sponge. Rinse thoroughly to remove all soap residue. Rinse again under warm water to ensure it’s clean.
Ensuring Thorough Drying
After rinsing, gently squeeze out excess water. Do not twist or pull the sponge. Lay it flat on a clean towel. This helps it dry evenly.
Avoid placing it in direct sunlight or near heat. Heat can damage the sponge material. Let it air dry completely before using it again.
Storage Solutions For Makeup Sponges
Proper storage of makeup sponges is crucial for their longevity. A clean sponge works better and feels nicer on the skin. It’s important to protect them from dirt and bacteria. Let’s explore the best ways to store your makeup sponges.
Avoiding Bacteria Growth
Makeup sponges are a breeding ground for bacteria. Storing them in damp places can lead to mold and germs. Always dry your sponge before putting it away. Avoid closed containers that trap moisture.
Using breathable storage options is best. Look for mesh bags or open containers. These allow air circulation. They help keep your sponges dry and fresh.
Ideal Storage Conditions
Store your makeup sponges in a cool, dry place. Avoid direct sunlight and high humidity. A bathroom cabinet can be a good choice, but ensure it is dry.
Consider using a designated makeup organizer. This keeps your sponges separated from other items. It also prevents them from getting squished or damaged.
Regularly check your sponges for any signs of wear. Replace them if they start to break down. Proper storage ensures your sponges last longer and stay clean.
When To Replace Your Makeup Sponge
Makeup sponges are essential tools for many beauty routines. They help blend foundation and concealer for a smooth look. Knowing when to replace them is important for skin health and makeup quality. Using an old sponge can cause issues. Let’s explore how long a makeup sponge lasts and the signs to look for when it’s time to get a new one.
Lifespan Of A Makeup Sponge
A good makeup sponge can last up to three months. This depends on how often you use it. Daily users may need to replace theirs sooner. Sponges can wear down quickly with frequent use. Regular cleaning helps extend their life but isn’t a fix-all. Over time, wear and tear are inevitable.
Signs That It’s Time For A New Sponge
Check for visible wear. Cracks or tears mean it’s time to replace it. A sponge that feels rough or hard is also a sign. It should feel soft and bouncy. If your sponge retains odors, it’s time for a new one. A sponge with mold or discoloration is no longer safe. Trust your instincts; if it looks or smells bad, replace it.
Troubleshooting Common Issues
Cleaning makeup sponges can sometimes lead to unexpected problems. Stains may linger. The sponge might lose its shape. Restoring your sponge can feel tricky. Here are solutions for common issues.
Dealing With Stains
Stains can be stubborn. They often remain after washing. Try using a gentle soap or cleanser. Look for one that removes oil and makeup effectively.
Soak the sponge in warm water. Add a few drops of soap. Let it sit for 10-15 minutes. This helps loosen the stains.
Gently squeeze the sponge. Rinse under running water. Repeat until the water runs clear. For tough stains, use a mixture of vinegar and water.
Restoring Shape And Softness
Sponges can lose their shape after many washes. To restore them, soak the sponge in warm water. This helps it regain its form.
After soaking, gently reshape it with your hands. Avoid squeezing too hard. Let it air dry on a towel. This keeps the sponge soft.
For extra softness, use a conditioner. Apply a small amount. Rinse well and reshape. This makes the sponge feel new again.

Credit: beautyblender.com
Eco-friendly Disposal Of Old Sponges
Cleaning your makeup sponge is important. But what do you do with it when it’s time to say goodbye? Disposing of old sponges can hurt the environment. Many sponges end up in landfills. They take years to break down. Choosing eco-friendly disposal methods helps reduce waste.
There are several ways to dispose of your old sponges. You can recycle them or find creative ways to reuse them. Let’s explore these options.
Recycling Options
Some beauty brands offer recycling programs. Check if your favorite brand has one. You can return your old sponges for proper recycling. This keeps them out of landfills. If your brand does not recycle, look for local recycling centers. They may accept specific types of sponges. Always read the labels. Some sponges are made of recyclable materials.
Creative Reuses
Old makeup sponges can have new life. Use them for crafts. Cut them into shapes for fun art projects. You can also use them for cleaning. Sponges are great for dusting or applying polish. They can even help with gardening. Use them to help plant seeds. Get creative and think outside the box.
Credit: nowbenidorm.com
Frequently Asked Questions
How Often Should I Clean My Makeup Sponge?
You should clean your makeup sponge at least once a week. This helps remove bacteria, dirt, and old makeup. Regular cleaning extends the sponge’s lifespan and ensures a flawless application. If you use your sponge daily, consider washing it more frequently to maintain hygiene.
What Is The Best Way To Clean A Makeup Sponge?
The best way to clean a makeup sponge is by using gentle soap or a specialized cleanser. Wet the sponge, apply the cleanser, and gently squeeze it. Rinse thoroughly until the water runs clear. This method effectively removes makeup residue and keeps your sponge in great condition.
Can I Use Dish Soap To Clean My Makeup Sponge?
Yes, dish soap can be used to clean your makeup sponge. However, opt for a mild, fragrance-free variety to avoid irritation. Mix the soap with warm water and gently work it into the sponge. Rinse well to remove all soap and makeup residue for best results.
Should I Dry My Makeup Sponge After Washing?
Absolutely! Drying your makeup sponge is essential for preventing bacteria growth. After washing, gently squeeze out excess water and let it air dry in a clean area. Avoid direct sunlight or heat sources, as these can damage the sponge’s material.
Conclusion
Cleaning your makeup sponge is essential for healthy skin. Dirty sponges can cause breakouts and irritation. Use gentle soap and warm water for best results. Rinse thoroughly to remove all soap. Squeeze out excess water and let it dry completely.
Regular cleaning keeps your makeup application smooth and flawless. Make it a habit to clean your sponge weekly. This simple routine helps you look your best. Healthy tools lead to a healthy complexion. Start today for a cleaner, happier makeup experience.