Creating a DIY makeup organizer can be fun and practical. It helps you keep your beauty products tidy and easy to find.
Many people struggle with messy makeup drawers or overflowing bags. A DIY makeup organizer not only solves this problem but also adds a personal touch to your space. You can use materials you already have at home, saving money and reducing waste.
Plus, making your own organizer allows you to customize it to fit your needs and style. Whether you have a few favorite products or a large collection, a simple DIY project can transform your makeup routine. Get ready to turn chaos into order and make your beauty space more enjoyable. Let’s explore how to create your own makeup organizer!
Introduction To Diy Makeup Organization
Making your own makeup organizer is fun and helpful. A DIY project can save money. It lets you use materials you already have. You can design it how you want.
A tidy vanity is important. It helps you find your makeup easily. It makes getting ready quicker. You feel more relaxed in a clean space. Plus, a neat area looks nice.
Benefits of a tidy vanity:
- Easy access to your favorite products.
- Less clutter means less stress.
- More space for new items.
- Creativity shines in a clean area.
Assessing Your Makeup Collection
Start by gathering all your makeup products. Check every drawer and bag. This helps you see what you have.
Next, sort your products into groups. Make piles for eyes, lips, and face items. Toss out anything that is old or used up.
After sorting, think about your space. Do you have a drawer or a shelf? Measure the space to know how many items fit.
Use boxes or trays to keep things organized. Label each box for easy access. This way, you find what you need quickly.
Choosing The Right Materials
Choosing the right materials is very important for your makeup organizer. Eco-friendly options are great for the environment. Look for materials like bamboo or recycled plastic. These choices are safe and good for nature.
Durability matters too. A strong makeup organizer lasts longer. It saves you money in the long run. Aesthetics also play a role. A pretty design makes you happy. Choose colors and shapes you love.
| Material | Eco-Friendly | Durability | Aesthetics |
|---|---|---|---|
| Bamboo | Yes | Very Strong | Natural Look |
| Recycled Plastic | Yes | Good | Variety of Colors |
| Wood | Depends | Strong | Warm Feel |
Credit: www.youtube.com
Designing Your Makeup Organizer
Creating your own makeup organizer is fun and easy. Start with custom compartments for each product. This helps keep everything tidy. Use small boxes or dividers to fit items like lipsticks and brushes. Measure your space first. This ensures a perfect fit.
Incorporate your personal style into the design. Choose colors and materials that you love. Use clear containers for a modern look. You can also decorate with stickers or paint. Make it unique to you!
Don’t forget to think about functionality. Choose a layout that works best for you. Keep frequently used items at the top. Store less-used items at the bottom. This keeps your organizer practical and beautiful.
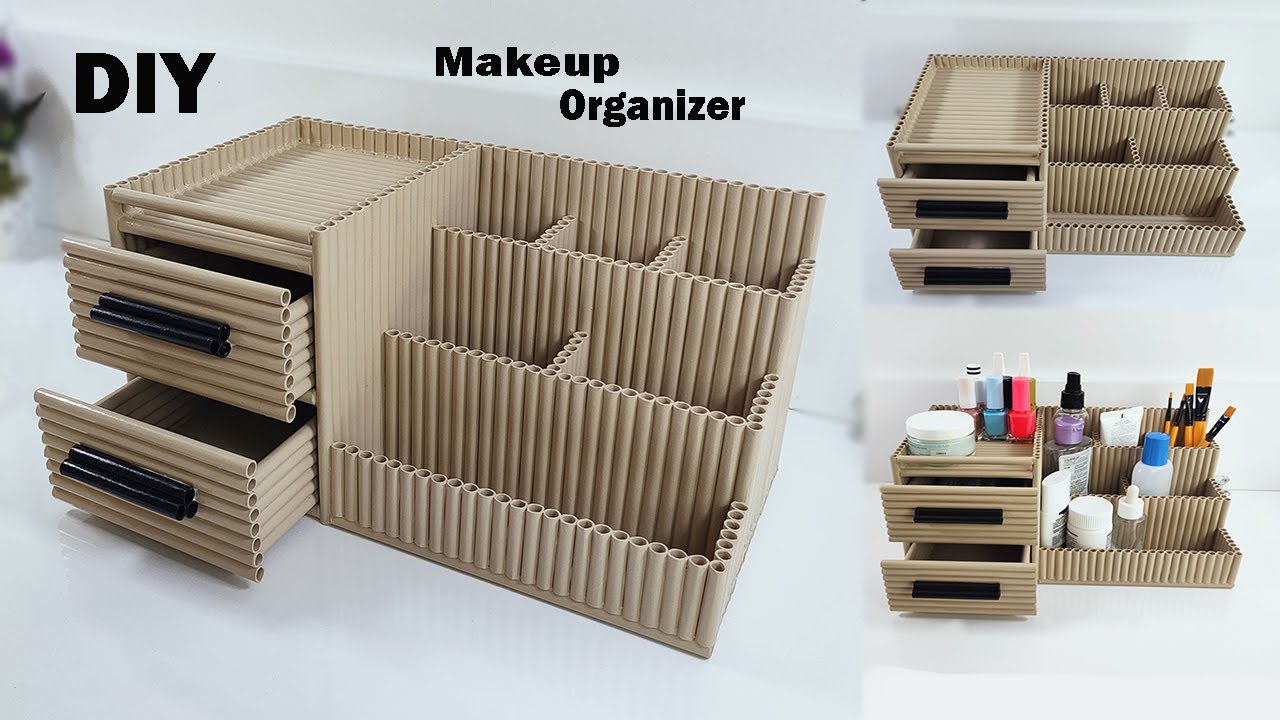
Step-by-step Construction Guide
Gather tools and supplies before starting your makeup organizer. You will need:
- Wood or cardboard for the base
- Scissors for cutting
- Glue or tape to hold pieces
- Paint or markers for decoration
- Ruler for measuring
- Pencil for marking
Make sure to have a clean workspace. This helps you stay organized. Having everything ready saves time and effort.
Next, follow the assembly instructions carefully. Measure all pieces before cutting. This ensures a good fit. Use glue or tape to attach each part. Let it dry completely. Then, decorate your organizer as you like.

Credit: www.pinterest.com
Creative Touches And Decoration
Bright colors make your makeup organizer fun. Use paint or stickers. Choose your favorite shades. Patterns can add charm. Stripes, dots, or flowers work well.
Think about personal touches. Add ribbons or beads for flair. Use small baskets to organize. Cute labels help you find things fast. Personalizing makes your space special.
Try different materials, too. Wood, fabric, or plastic can shine. Mix and match for a unique look. Personal touches make your makeup area stand out.
Organization Tips And Tricks
Organizing makeup can save time and space. Use small boxes or containers. This helps keep items together. Label each box for easy finding.
Utilize vertical space. Hang shelves on walls. Store items on the shelves. This keeps counters clear.
Use drawer dividers. These help separate different products. Brushes, lipsticks, and palettes stay neat.
Clear containers show what is inside. This makes it easy to see. Choose colorful containers for fun.
Regularly check products. Throw away old or unused items. This keeps your collection fresh and organized.

Credit: www.pinterest.com
Showcasing Your Diy Organizer
Share your DIY makeup organizer proudly. Take clear pictures. Show it from different angles. Make sure the lighting is good. A bright and neat background helps too.
Post your pictures on social media. Use platforms like Instagram and Facebook. Tag your friends. Encourage them to try making their own. Share tips and tricks in the comments.
Join groups or forums. Connect with others who love DIY projects. Share your creation. Ask for feedback. Give advice to those who ask.
Use simple captions. Explain what materials you used. Share how you made it. This helps others understand your process.
Frequently Asked Questions
How Can I Make A Diy Makeup Organizer?
You can create a DIY makeup organizer using various materials like cardboard, wood, or plastic containers. Start by measuring your space and selecting a design that fits your needs. Use compartments to separate products, ensuring everything is easily accessible. Personalize it with paint or decorations for a unique touch.
What Materials Do I Need For A Makeup Organizer?
Common materials for a makeup organizer include cardboard, wood, acrylic, or repurposed containers. You can also use decorative paper, paint, and adhesive for customization. Choose materials based on your desired style and durability. Make sure they can hold your makeup products securely without tipping over.
Can I Customize My Makeup Organizer?
Absolutely! Customizing your makeup organizer is part of the fun. You can paint it in your favorite colors, add labels for easy identification, or use decorative items to enhance its look. Tailor the size and compartments to fit your makeup collection perfectly, making it both functional and stylish.
How To Organize Makeup In A Diy Organizer?
To organize makeup effectively, categorize products by type, such as lipsticks, eyeshadows, and brushes. Use separate compartments for each category to maintain order. Consider storing frequently used items at the front for easy access. Regularly declutter and rotate products to keep your organizer efficient and tidy.
Conclusion
Creating a DIY makeup organizer is a fun project. It helps you save space and keep your makeup tidy. With simple materials, you can design something unique. Organizing your makeup makes it easy to find what you need. This DIY project also adds a personal touch to your space.
Enjoy the process and be creative. A well-organized makeup area can brighten your day. Try making your own makeup organizer today. You will love the results and feel proud of your work. Start organizing and enjoy your beauty routine more!