Creating a DIY makeup vanity can be both fun and practical. This project allows you to personalize your space while keeping everything organized.
A makeup vanity is more than just a place to apply makeup. It reflects your style and makes your beauty routine easier. With a DIY approach, you can design a vanity that fits your needs and budget. Imagine a space tailored just for you, where every product has its place.
You can choose colors, materials, and layout that match your taste. Whether you have a small corner or a large room, a DIY makeup vanity can transform your area. Let’s explore how to create your own unique makeup station that combines beauty and functionality.

Credit: www.lizmarieblog.com
Introduction To Diy Makeup Vanity Creation
Personalizing your vanity area has many benefits. First, it makes your space unique. You can express your style and preferences. A custom look brings joy. A DIY makeup vanity can also save money. Buying ready-made items costs more.
Creating a personalized area is satisfying. You can choose colors, materials, and designs. This reflects your personality. A well-organized space helps you find items easily. It makes your daily routine smoother.
Essential tools and materials include:
| Tools | Materials |
|---|---|
| Screwdriver | Wood or MDF |
| Drill | Paint or stain |
| Measuring tape | Mirror |
| Sandpaper | Drawer pulls |

Credit: rainonatinroof.com
Choosing The Right Spot
Choose a spot with good natural light. This helps you see colors clearly. Look for a window nearby. Morning light is usually the best.
Keep space constraints in mind. A small area can still work. Use a small table or desk. Organize your makeup well. Use containers for easy access. Keep your most used items on top.
Efficient use of space makes a big difference. Wall-mounted mirrors save room. Small shelves can hold products. Make your vanity both pretty and practical.
Designing Your Vanity Layout
Design a vanity layout that fits your needs. Choose a spot with good light. Make sure your mirror is easy to see. Think about where you will keep your makeup and tools.
Incorporate your personal style. Use colors that make you happy. Add decor that reflects who you are. Consider using a theme, like modern or vintage.
For a functional arrangement, keep similar items together. Group your skincare, makeup, and tools. Use trays or small boxes for easy access. Make sure everything is within reach.
Credit: jenwoodhouse.com
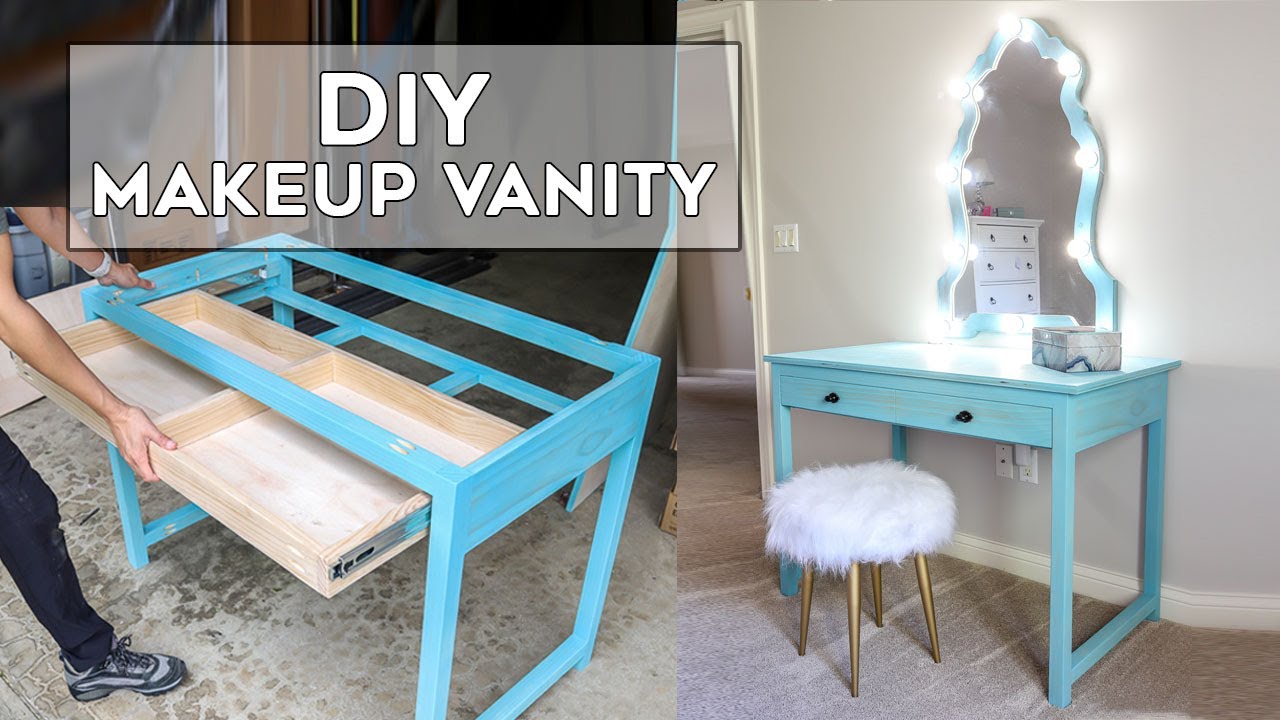
Building The Vanity Base
Start with a flat board. This will be the top of your vanity. Choose the size you want. Make it wide enough for your items. Cut the board to fit your space.
Next, use four legs to support the vanity. You can buy legs or make them from wood. Make sure they are strong. Attach the legs to each corner of the board.
For the shelf, cut another board. Place it between the legs. This gives extra space for your makeup. Secure it with screws for stability.
Paint or stain the wood. Choose a color that you like. Let it dry completely. Now, your vanity base is ready for the next steps.
Selecting The Perfect Mirror
Choosing the right mirror is important for your makeup vanity. Mirrors come in different types and shapes. Each type serves a purpose.
Wall mirrors save space. They fit well in small areas. Tabletop mirrors are great for close-up work. They are easy to move.
Consider the shape too. Round mirrors provide a soft look. Square mirrors offer a modern touch.
Lighting is key for your mirror. Bright lights help you see better. Soft lights can create a nice mood.
Place lights around the mirror for even brightness. Avoid shadows on your face. Good lighting makes a big difference.
Storage Solutions For Makeup And Tools
DIY drawer organizers help keep makeup tidy. Use small boxes to divide space. This way, lipsticks, brushes, and other tools stay organized. You can make dividers from cardboard or wood. Customize them to fit your drawers perfectly.
Creative countertop containers add style and function. Use jars or small baskets to hold items. Clear jars let you see what’s inside. Group similar items together for easy access. This makes your makeup routine faster and more fun.
Using these simple tips makes a big difference. A neat space helps you find what you need quickly. Enjoy your makeup time in a pretty and organized area.
Adding Glamorous Touches
Choose a color scheme that matches your style. Soft pastels create a calm feel. Bright colors add energy and fun. Mix and match colors for a personal touch.
Use decorative elements to enhance beauty. A nice mirror adds shine. Try string lights for a warm glow. Decorative trays can hold makeup items neatly.
Flowers or plants bring life to the space. Use stylish containers for brushes. A chic stool can make your vanity pop. Each piece should reflect your personality.
Lighting Your Vanity Like A Pro
Good lighting is very important for your makeup vanity. It helps you see clearly. Choose lights that give off bright, white light. This mimics natural sunlight.
Here are some options for lighting:
- LED Strip Lights: Easy to install and very bright.
- Vanity Bulbs: Great for a professional look.
- Task Lamps: Good for focused lighting on specific areas.
- Wall Sconces: Add style and extra light.
Make sure to position your lights correctly. Place them at eye level. Avoid shadows on your face. This way, you can apply makeup easily.
Finishing Touches And Maintenance
To protect your vanity, use a soft cloth. Avoid harsh cleaners. Wipe spills quickly to prevent stains. This keeps surfaces looking new.
For materials like wood, use a sealant. It adds a layer of protection. This helps against scratches and water damage.
Keep your vanity organized. Use trays or small baskets. This helps store makeup and tools neatly. It makes finding items easy.
Regularly clean your makeup brushes. Dirty brushes can cause skin problems. Wash them with mild soap and water.
Keep the vanity surface clean. Dust it often with a microfiber cloth. A clean space feels fresh and welcoming.
Frequently Asked Questions
How Can I Build A Diy Makeup Vanity?
Building a DIY makeup vanity involves choosing the right materials and design. Start with a sturdy table or desk. Add storage solutions like shelves or drawers for organization. Consider lighting options, such as LED strips or a mirror with lights, for better visibility.
Personalize it with decor that reflects your style.
What Materials Do I Need For A Makeup Vanity?
For a DIY makeup vanity, you’ll need wood or a sturdy desk, paint or varnish, mirrors, and storage bins. Additional materials can include drawer organizers, lighting fixtures, and decorative items. Ensure you choose materials that fit your aesthetic and are durable for daily use.
How Much Does A Diy Makeup Vanity Cost?
The cost of a DIY makeup vanity varies widely based on materials and design. Basic setups can start at around $50, while more elaborate designs can exceed $300. Consider your budget and prioritize essential features like storage and lighting to create an efficient workspace.
What Tools Do I Need For Building A Vanity?
Essential tools for building a DIY makeup vanity include a saw, drill, screws, and a measuring tape. You may also need sandpaper for smoothing surfaces and paintbrushes for finishing touches. Having a level on hand ensures that your vanity is properly aligned and stable.
Conclusion
Creating your own makeup vanity can be fun and easy. It adds style and organization to your space. Use simple materials and tools you can find at home. Personalize your vanity to fit your style and needs. This project can save money while enhancing your daily routine.
Enjoy the process of designing and building. A DIY makeup vanity is not just functional; it reflects your personality. Start your project today and enjoy the benefits of your hard work. Your perfect makeup station awaits.